Creating a new Entity Module
vtlib simplifies the creation of new CRM modules. Developers can use the vtlib to develop vtiger
CRM modules that add new functionality to the vtiger CRM. These modules can then be packaged for
easy installation by the Module Manager.
The following are important steps that should be followed to get a basic working module. The
backend section covers database-level changes for the module, and the frontend section covers
the UI files.
Backend
- Step 1 Create module instance, create database tables, and add it to Menu
- Step 2 Add UI blocks for the module.
- Step 3 Add fields and associate them to blocks. Set at least one field as an entity identifier.
- Step 4 Create default list view and additional filters (make sure to create a filter named All which is
- the default filter)
- Step 5 Create Related List (to show in the ”More information” tab)
- Step 6 Setting Sharing Access Rules
- Step 7 Setting Module Tools options (i.e., Import/Export)
FrontEnd
Step 8 Creating Module directory and files
Packaging
Step 9 Packaging
Additional Options
➔ Module Templates (to customize Form, List View, and Settings UI )
➔ Module Settings (to allow administrators to configure your module)
➔ Module Events (only available in vtiger CRM version 5.1)
➔ Module Webservices (only available in vtiger CRM version 5.1)
Creating Payslip Module in Vtiger
It will have the ability to create, edit, and delete payslip records. You can create Custom Filters for the Listview,
which displays the list of payslip instances.
Step 1: Creating Module
Class Vtiger_Module provides an API to work with Vtiger CRM modules.
include_once('vtlib/Vtiger/Module.php');
$moduleInstance = new Vtiger_Module();
$moduleInstance->name = 'Payslip';
$moduleInstance->save();
$moduleInstance->initTables();
$menuInstance = Vtiger_Menu::getInstance('Tools');
$menuInstance->addModule($moduleInstance);
Vtiger_Module->initTables() API will initialize (create) the 3 necessary tables a module should
have as explained below:

Vtiger_Menu->addModule() API will create a menu item which serves as a UI entry point for the module.
Step 2: Creating Block (in UI Form)
Class Vtiger_Block provides API to work with a Module block, the container which holds the fields
together.
The example given below describes the way of creating new blocks for the module created earlier:
include_once('vtlib/Vtiger/Module.php');
$blockInstance = new Vtiger_Block();
$blockInstance->label = 'LBL_PAYSLIP_INFORMATION';
$moduleInstance->addBlock($blockInstance);
$blockInstance2 = new Vtiger_Block();
$blockInstance2->label = 'LBL_CUSTOM_INFORMATION';
$moduleInstance->addBlock($blockInstance2);
NOTE: LBL_CUSTOM_INFORMATION block should always be created to support Custom Fields for a module
Step 3: Adding Fields
Class Vtiger_Field provides API to work with a Module field, which are the basic elements that store and display the module record data. The example given below describes the way of creating a new field for the module created earlier:
include_once('vtlib/Vtiger/Module.php');
$fieldInstance = new Vtiger_Field();
$fieldInstance->name = 'PayslipName';
$fieldInstance->table = 'vtiger_payslip';
$fieldInstance->column = 'payslipname';
$fieldInstance->columntype = 'VARCHAR(100)';
$fieldInstance->uitype = 2;
$fieldInstance->typeofdata = 'V~M';
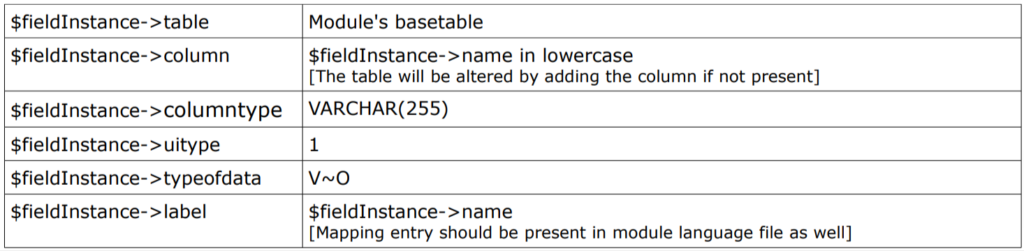
$blockInstance->addField($fieldInstance);NOTE: The fieldInstance name is a mandatory value to be set before saving/adding to the block.
Other values (if not set) are defaulted as explained below:

Entity Identifier
One mandatory field should be set as entity identifier of module once it is created. This field will be used for showing the details in ‘Last Viewed Entries’ etc…
$moduleInstance->setEntityIdentifier($fieldInstance);
Set Picklist Values
If the field is of Picklist type (UI type 15, 16, 33, 55, 111) then you can configure the initial values using the following API:
$fieldInstance->setPicklistValues( Array (‘Value1’, ‘Value2’) );
Set Related Module
If the field is of Popup select type (uitype=10), you can configure the related modules which could be selected via Popup using the following API:
$fieldInstance->setRelatedModules(Array(‘OtherModule1’, ‘OtherModule2’));
To unset the related module you can use the following API:
$fieldInstance->unsetRelatedModules(Array(‘OtherModule2’));
Set Help Information
Providing help information for the module field will be useful to educate users.
include_once('vtlib/Vtiger/Module.php');
$fieldInstance = new Vtiger_Field();
$fieldInstance->name = 'LinkTo';
...
$fieldInstance->helpinfo = 'Relate to an existing contact';
...
$blockInstance->addField($fieldInstance);
You can set the help text for an existing field using the following API:
$fieldInstance->setHelpInfo('HELP CONTENT');NOTE: Given below is the snippet of code that should be added to EditView.php of the existing module to
enable Help Icon support.
// …
// Gather the help information associated with fields
$smarty->assign(‘FIELDHELPINFO’, vtlib_getFieldHelpInfo($currentModule));
// END
// …
if($focus->mode == ‘edit’) $smarty->display(‘salesEditView.tpl’);
else $smarty->display(‘CreateView.tpl’);
Recommended:
➢ Provide translation mapping for the help info being used for a field.
For example, set the help info as HELP_FILEDNAME_INFO and provide the contents in
the language file.
$fieldInstance->setHelpInfo(‘HELP_FIELDNAME_INFO’);
In module//language/en_us.lang.php
$mod_strings = Array(
…
‘HELP_FIELDNAME_INFO’ => ‘Fieldname help contents should be here’,
…);
➢ Avoid newlines in the help content, you can use tag instead
➢ Preferably escape (‘, “, <, >) with HTML entities like (“, < >)
➢ It is good to have keep the content less, if you want to provide more details you can link to an external page as shown in the example below:
Set MassEdit property
NOTE: Mass edit feature is available from vtiger 5.1 onwards
You can make the field available for mass editing use the following ways described below:
When creating the field you can set the property:
include_once('vtlib/Vtiger/Module.php');
$fieldInstance = new Vtiger_Field();
$fieldInstance->name = 'TestField';
…
$fieldInstance->masseditable = 1;
…
$blockInstance->addField($fieldInstance);
If you have an existing field its property can be updated using the API:
$fieldInstance->setMassEditable(value);The value set for masseditable property has the following meaning:

Step 4: Creating Filters
Class Vtiger_Filter provides API to work with a Module’s custom view or filter. The list view display is controlled via these filters.
The example given below describes the way of creating new filter for the module:
include_once('vtlib/Vtiger/Module.php');
$filterInstance = new Vtiger_Filter();
$filterInstance->name = 'All';
$filterInstance->isdefault = true;
$moduleInstance->addFilter($filterInstance);
Configure fields
To add fields to the filter you can use the following API:
$filterInstance->addField($fieldInstance, $columnIndex);Where $columnIndex (optional) is the order/index at which the field should appear in the list view.
Setup Rules
Once the field is added to filter you can setup rule (condition) for filtering as well using the
following API:
$filterInstance->addRule($fieldInstance, $comparator, $compareValue,$columnIndex);
Where comparator could be one of the following:
- EQUALS
- NOT_EQUALS
- STARTS_WITH
- ENDS_WITH
- CONTAINS
- DOES_NOT_CONTAINS
- LESS_THAN
- GREATER_THAN
- LESS_OR_EQUAL
- GREATER_OR_EQUAL
$compareValue is the value against with the field needs to be compared.
$columnIndex (optional) is the order at which this rule condition should be applied.
Step 5: Related Lists
One module could be associated with multiple records of other module that is displayed under “More Information” tab on Detail View.
The example given below describes the way of creating a relation between a Payslip and Accounts module:
include_once('vtlib/Vtiger/Module.php');
$moduleInstance = Vtiger_Module::getInstance('Payslip');
$accountsModule = Vtiger_Module::getInstance('Accounts');
$relationLabel = 'Accounts';
$moduleInstance->setRelatedList(
$accountsModule, $relationLabel, Array('ADD','SELECT')
);
With this you can Add one or more Accounts to Payslip records.
To drop the relation between the modules use the following:
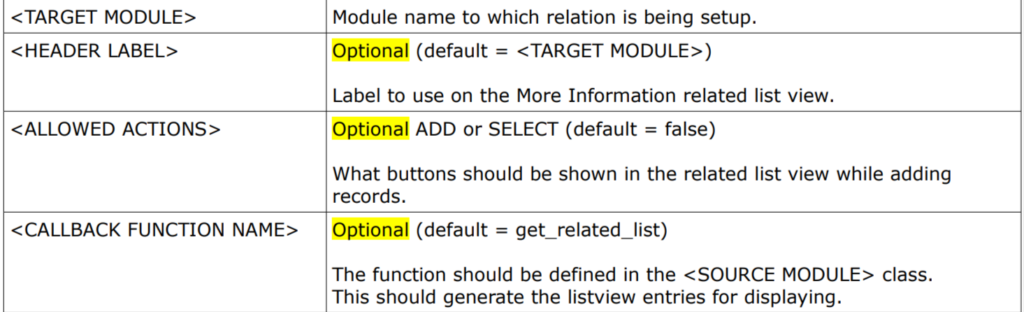
$moduleInstance->unsetRelatedList($targetModuleInstance);About setRelatedList API
Vtiger_Module->setRelatedList(<TARGET MODULE>[, <HEADER LABEL>, <ALLOWED ACTIONS>,
<CALLBACK FUNCTION NAME>]);
This API will create an entry in the vtiger_crmentityrel table to keep track of relation between module
records. Standard modules available in vtiger CRM handles the relation in separate tables and performs the JOIN to fetch data specific to each module.
Step 6: Sharing Access Rules
Sharing access configuration for the module can be done as shown below:
The example given below describes the way to configure the Payslip module as Private
include_once('vtlib/Vtiger/Module.php');
$moduleInstance = Vtiger_Module::getInstance('Payslip');
$moduleInstance->setDefaultSharing('Private');
The can be one of the following:
- Public_ReadOnly
- Public_ReadWrite
- Public_ReadWriteDelete
- Private
Step 7: Module Tools
Features like Import, Export are termed as module tools. Such tools can enabled or disabled as shown below: The example given below describes the way to enable and disable the tools for Payslip module
include_once('vtlib/Vtiger/Module.php');
$moduleInstance = Vtiger_Module::getInstance('Payslip');
$module->enableTools(Array('Import', 'Export'));
$module->disableTools('Export');
Optional Step: Module Events
To check if your vtiger CRM supports Eventing use the following:
include_once('vtlib/Vtiger/Event.php');
boolean Vtiger_Event::isSupported();
To register an event for a module, use the following:
include_once('vtlib/Vtiger/Event.php');
Vtiger_Event::register('<MODULENAME>','<EVENTNAME>','<HANDLERCLASS>',
'<HANDLERFILE>);
Example: Registering event callback before and after save.
if(Vtiger_Event::hasSupport()) {
Vtiger_Event::register(
'Payslip', 'vtiger.entity.aftersave',
'PayslipHandler', 'modules/Payslip/PayslipHandler.php'
);
Vtiger_Event::register(
'Payslip', 'vtiger.entity.beforesave',
'PayslipHandler', 'modules/Payslip/PayslipHandler.php'
);
}
modules/Payslip/PayslipHandler.php
<?php
class PayslipHandler extends VTEventHandler {
function handleEvent($eventName, $data) {
if($eventName == 'vtiger.entity.beforesave') {
// Entity is about to be saved, take required action
}
if($eventName == 'vtiger.entity.aftersave') {
// Entity has been saved, take next action
}
}
}
?>
Optional Step: Module Webservices
You will need to invoke the setup API to enable the support for the custom modules.
include_once('vtlib/Vtiger/Module.php');
$moduleInstance = Vtiger_Module::getInstance('Payslip');
$moduleInstance->initWebservice();
Complete script to payslip module
Here is the complete script (vtlib.Test.Create.Module1.php) which creates the Payslip module
<?php
// Turn on debugging level
$Vtiger_Utils_Log = true;

include_once('vtlib/Vtiger/Menu.php');
include_once('vtlib/Vtiger/Module.php');

// Create module instance and save it first
$module = new Vtiger_Module();
$module->name = 'Payslip';
$module->save();

// Initialize all the tables required
$module->initTables();
/**
 * Creates the following table:
 * vtiger_payslip (payslipid INTEGER)
 * vtiger_payslipcf(payslipid INTEGER PRIMARY KEY)
 * vtiger_payslipgrouprel((payslipid INTEGER PRIMARY KEY, groupname VARCHAR(100))
 */

// Add the module to the Menu (entry point from UI)
$menu = Vtiger_Menu::getInstance('Tools');
$menu->addModule($module);

// Add the basic module block
$block1 = new Vtiger_Block();
$block1->label = 'LBL_PAYSLIP_INFORMATION';
$module->addBlock($block1);

// Add custom block (required to support Custom Fields)
$block2 = new Vtiger_Block();
$block2->label = 'LBL_CUSTOM_INFORMATION';
$module->addBlock($block2);

/** Create required fields and add to the block */
$field1 = new Vtiger_Field();
$field1->name = 'PayslipName';
$field1->table = $module->basetable;
$field1->column = 'payslipname';
$field1->columntype = 'VARCHAR(255)';
$field1->uitype = 2;
$field1->typeofdata = 'V~M';
$block1->addField($field1); /** Creates the field and adds to block */

// Set at-least one field to identifier of module record
$module->setEntityIdentifier($field1);

$field2 = new Vtiger_Field();
$field2->name = 'PayslipType';
$field2->label = 'Payslip Type';
$field2->columntype = 'VARCHAR(100)';
$field2->uitype = 15;
$field2->typeofdata = 'V~O';// Varchar~Optional
$block1->addField($field2); /** table and column are automatically set */

$field2->setPicklistValues( Array ('Employee', 'Trainee') );

$field3 = new Vtiger_Field();
$field3->name = 'Month';
$field3->uitype = 23;
$field3->typeofdata = 'D~M'; // Date~Mandatory
$block1->addField($field3); /** table, column, label, set to default values */

$field4 = new Vtiger_Field();
$field4->name = 'LinkTo';
$field4->label= 'Link To';
$field4->table = 'vtiger_payslip';
$field4->column = 'linkto';
$field4->columntype = 'VARCHAR(100)';
$field4->uitype = 10;
$field4->typeofdata = 'V~O';
$field4->helpinfo = 'Relate to an existing contact';
$block1->addField($field4);
$field4->setRelatedModules(Array('Contacts'));

/** Common fields that should be in every module, linked to vtiger CRM core table
*/
$field5 = new Vtiger_Field();
$field5->name = 'assigned_user_id';
$field5->label = 'Assigned To';
$field5->table = 'vtiger_crmentity';
$field5->column = 'smownerid';
$field5->uitype = 53;
$field5->typeofdata = 'V~M';
$block1->addField($field5);

$field6 = new Vtiger_Field();
$field6->name = 'CreatedTime';
$field6->label= 'Created Time';
$field6->table = 'vtiger_crmentity';
$field6->column = 'createdtime';
$field6->uitype = 70;
$field6->typeofdata = 'T~O';
$field6->displaytype= 2;
$block1->addField($field6);

$field7 = new Vtiger_Field();
$field7->name = 'ModifiedTime';
$field7->label= 'Modified Time';
$field7->table = 'vtiger_crmentity';
$field7->column = 'modifiedtime';
$field7->uitype = 70;
$field7->typeofdata = 'T~O';
$field7->displaytype= 2;
$block1->addField($field7);
/** END */

// Create default custom filter (mandatory)
$filter1 = new Vtiger_Filter();
$filter1->name = 'All';
$filter1->isdefault = true;
$module->addFilter($filter1);

// Add fields to the filter created
$filter1->addField($field1)->addField($field2, 1)->addField($field5, 2);

// Create one more filter
$filter2 = new Vtiger_Filter();
$filter2->name = 'All2';
$module->addFilter($filter2);

// Add fields to the filter
$filter2->addField($field1);
$filter2->addField($field2, 1);

// Add rule to the filter field
$filter2->addRule($field1, 'CONTAINS', 'Test');

/** Associate other modules to this module */
$module->setRelatedList(Vtiger_Module::getInstance('Accounts'), 'Accounts',
Array('ADD','SELECT'));

/** Set sharing access of this module */
$module->setDefaultSharing('Private');

/** Enable and Disable available tools */
$module->enableTools(Array('Import', 'Export'));
$module->disableTools('Merge');
?>